Parts Shifting While You Tack? Fix Your Clamping Setup Before You Blame Technique
If your tack welds keep pulling joints out of alignment, or you spend more time re-grinding and re-tacking than actually welding, the problem is usually upstream of the arc. Across welding forums, the same complaint repeats: “parts move when I tack.” The fix is rarely more tacks or heavier tacks. It is better clamping — the right reach, the right pressure, and the right pad contact for the joint.
Featured Product Quick Take
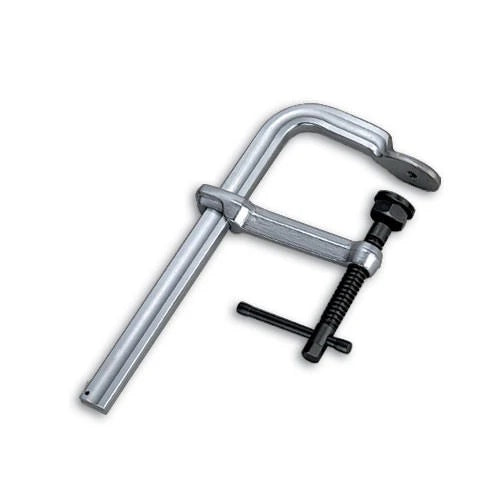
- Name: Strong Hand UM105, 10.5" Regular Duty Utility Welding Clamp
- SKU: UM105
- Price: Unknown (Verify)
- What it fixes: parts shifting during tack-up caused by insufficient clamp reach, uneven pressure, or wrong clamp style.
- Why it matters: consistent joint alignment, fewer re-tacks, less grinding, and less wasted filler metal.
- •Brand: Strong Hand Tools (from product page)
- •Model: UM105 (from product page)
- •Capacity: 10.5" (from product title)
- •Duty rating: Regular duty (from product title)
- •Type: Utility welding clamp (from product title)
- •Clamping force (lbs): Unknown (Verify)
- •Throat depth: Unknown (Verify)
Clamp reach and jaw style must match your workpiece thickness and joint geometry. If anything is unclear, treat it as Unknown (Verify).
What This Fix Solves
- • Parts shift or rotate during tack-up, causing misalignment
- • Joints pull open or close unevenly from thermal stress
- • You keep adding more tacks to “hold it” instead of fixing the clamp setup
- • Warping on thin material that could be controlled with proper fixturing
Root Cause Breakdown (Why Parts Move)
- Not enough clamp reach: the clamp cannot get far enough across the workpiece to apply pressure where it matters.
- Wrong pad contact: flat pads on round stock (or vice versa) create point contact instead of stable grip.
- Uneven clamping pressure: one side is tight, the other is loose. The part pivots when heat is applied.
- Too few clamp points: a single clamp on a long joint lets the far end move freely.
- Thermal distortion: the weld shrinks as it cools, pulling the joint. Proper clamping resists this force.
The Fix (Actionable Steps)
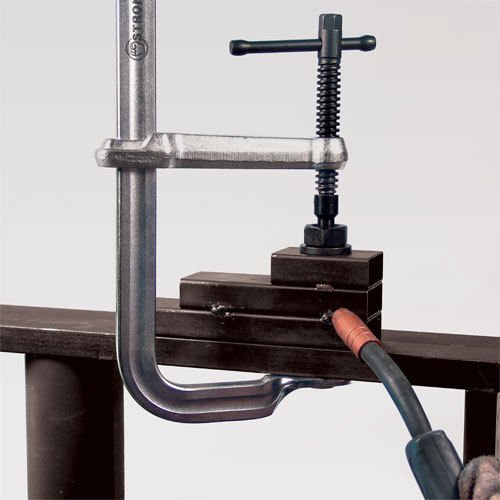
- Match clamp reach to workpiece width: the UM105 provides 10.5" of reach. Confirm this covers your typical assembly.
- Use the correct pad for the joint profile: flat pad for flat stock, V-pad for round/angle, pipe jaw for tubing. The XMVB accessory kit adds all four options.
- Clamp on both sides of the joint: one clamp holds the part, a second clamp resists rotation.
- Tighten evenly: snug both clamps before welding. Do not over-tighten — you want firm contact, not distortion.
- Tack in a balanced sequence: alternate tack locations (center, then ends) to distribute thermal stress.
- Leave clamps on until the tacks cool: removing clamps while the joint is still hot allows movement.
Key Specs / Fitment Notes (Bullets Only)
- •Brand: Strong Hand Tools (from product page)
- •Model: UM105 (from product page)
- •Capacity: 10.5" (from product title)
- •Duty rating: Regular duty (from product title)
- •Type: Utility welding clamp (from product title)
- •Clamping force (lbs): Unknown (Verify)
- •Throat depth: Unknown (Verify)
Before You Order Checklist
- Machine: welder make/model
- Process: MIG / TIG / Stick
- Material: mild steel / stainless / aluminum
- Thickness: typical range of workpieces
- Consumables: N/A (clamp) — but verify accessory pad style
- Torch/gun: N/A (clamp)
- Gas: N/A (clamp)
Fitment note: for clamps, the most common wrong order is reach (too short for the assembly). Confirm your typical workpiece width before ordering.
Recommended Accessories (Priority Order)
Comparison Block (Alternatives)
10.5" reach, regular duty, versatile jaw with accessory kit option. Good general-purpose welding clamp.
Common but limited reach and uneven pressure. Often the root cause of parts shifting during tack-up.
Helpful for holding angles but do not apply clamping force. Best paired with a clamp, not used alone.
Safety Note
Clamps can slip under load. Keep hands and body clear of the workpiece when tacking. Do not weld directly on clamp surfaces — spatter and heat damage reduce grip over time. Inspect clamp pads and threads regularly. If a clamp feels loose or stripped, replace it before it fails during a critical hold.
Add to Cart — or Confirm Reach First
Add the Strong Hand UM105 to your cart. Not sure if 10.5 inches of reach is enough for your assemblies? Call with your typical workpiece dimensions and joint type.